Monday, August 29, 2016

Modeling Logging Machine

Experimenting: Quad Tool
I decided to play around with the Quad Tool in Maya. Its used for re-topology. I just watched some tutorials and experimented with it. Didn't use it for my final model.

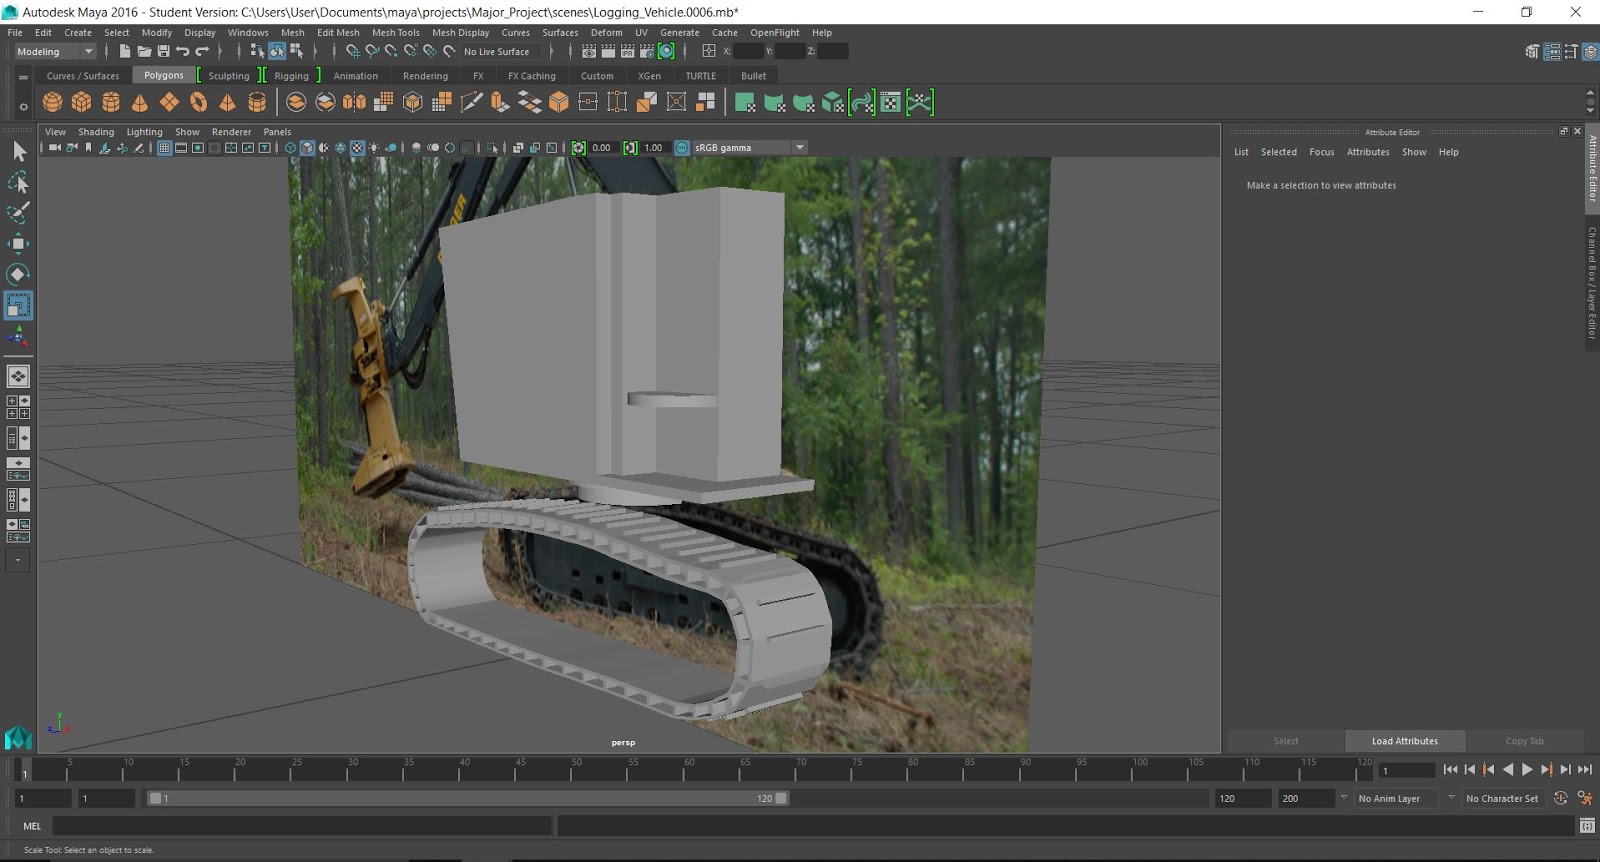
My model topology is OK but a bit too high res around the middle of the body. I'll fix it up later. Since this model isn't made for animation, topology isn't too important, however I do want to adapt my modeling style to be ready for animation, even if the model will never be animated.

To Do List: Holidays

Week One:
  • Model (finish) logging vehicle
Week Two:
  • Modeling assets (Maya only at this stage)
  • Camera run through of composition
  • Create mock up booklets (testing book style, how to make etc, & rough booklet with content inside)
  • Talk to friend about photography 

Saturday, August 27, 2016

10/5 Report: Tanya Marriot


Being told to figure out my final composition through a camera fly through in Maya was very helpful. It will cut the planning composition time shorter and also give me a real look at what it will look like (not just what I imagine it will look like in my head). When I have finalized my composition I will "photo bash" it in Photoshop so there is a good understanding of colour and horizon also. I do need to really think about what will be in my booklet (what will it add to my project, communicate etc). I have done a bit of planning around that already but I will do some more planning with those points in mind. 

These holidays I will continue modeling assets, creating more mock up booklets and start researching how to "sew" my composition together. By the end of the first week I will have my logging vehicle finished (I know you suggested grabbing one online but I would love to take credit for all the models in my scene.) Once I have finalized my composition I will ask my photographer friend if they would photograph scenes etc so I can image composite in my final. 

I saw a good range of works at the supercrit. I was underwhelmed with the amount of work some people produced but also was impressed at people who prepared well. A lot of people's subjects didn't interest me but that can definitely be changed when they continue to develop their work. 

Week 6: Formative:

Notes:
  • Start modeling assets now
  • Run a camera through scene in Maya to work out composition (Think filmatically) 
  • Consider making your final into a fancy pop up book -why? audience?
  • Think about what your book is there for -what does it add, tell, communicate etc
  • Photobash concepts/ frames
  • Sheet one has good tension
  • Camera could loop instead of straight through
  • Think about each frame's focus/content
  • Talk to Justin Rotolo from CMP department 


Friday, August 26, 2016

"Final" Composition to Scale

I drew my composition up to scale and it did help to see it in the final size. Its about two metres long and an A4 portrait tall. I think there is too much wood stumps at the end for its size.
Click image to enlarge: 

Wednesday, August 24, 2016

Modeling: Flowers

Angel Trumpet Flower: 
I'll add more details in Zbrush but this is the basic model created in Maya:

Friday, August 19, 2016

Workshop Clusters

A. Dragon's Den: Focus/Flare

  • Consider making for a school
  • Narrow down target audience (general public is too vague, but environmentalists and animal rights activists is good) 
  • Look into Bright Eyes, movie
  • Look at Watership Down, you're retelling the Watership Down story but making it your own. How is it different?
B. Visual Production: Plan
  • Critical Path Analysis (CPA) -jug timeline
  • Sort out critical moment and complete first (key moment > essence of the project)
  • Find insight, find focus point, pitch actual story and not just general outcome, ideas and themes
  • Insight: A problem within your problem. Why does the audience care about deforestation? How do they become interested and involved in the issue? -could look into farming cattle and the effects of deforestation, Do I need to show the cattle? Can I only show part of the whole narrative (focus on important area of story and communicate cattle in booklet)
C: Panic Room: Focus
  • Take tutors advice on but you make your own decisions
  • Look at Watership Down, How are you making it different/ your own?  

Thursday, August 18, 2016

Logging Machine Concepts

Notes:
  • Big
  • Scary, intimidating
  • Loud
  • Dirty
  • Smoke from a chimney 
  • Not necessarily an accurate machine
  • Give it a personality 
Some logging machine concepts. I combined different existing logging machines parts together. I wanted to keep the teeth as they give the machine a monster like "personality". I also want to keep the tank wheels as they communicate war themes and destruction. 

Wednesday, August 17, 2016

Thumb Nailing on A3s 2


I asked my friend Josepth for advice on composition (he's an illustration student) since I struggle a lot with it. He gave me some good advice: Don't worry about the details. Make the thumb nails as simple as possible, you want to get your thumb nails to be seen and the compositions seen straight away. 
He also came up with an interesting idea of having a little  plant or seed growing in the last frame to communicate that the forest is destroyed but there is always the chance of regrowing ;communicates hope. 

Tuesday, August 16, 2016

Timeline for Week 5

Week 5:

Wednesday:
  • Start designing logging machine
Thursday:
  • Cont. thumb nailing (4 sheets)
  • Choose plants to model (consider colours)
  • Start (or think about) colours in scene
  • Cont. designing machine
Friday:
  • Draw finalized scene to scale (tape A3s together) 
  • Finalize Vehicle
  • Layouts with colour consideration 

Colour Palette Research

Forests:
Forest Candy color palette
A Forest Of Greens color palette
Dark Forest color palette
Flowers:
Wildflowers Flourish color palette
Sunflowers color palette
Forest flowers color palette
Fresh Flowers color palette
Dead Forest: 
Golden Flowers color palette
Dead Forest color palette
Death by a Liar color palette

Coloured Plant and Forest Research

Caroline suggested I make my forest more colourful to make the juxtaposition between the dead forest at the end more striking. I'm not certain I will go with this look at the end but I'll research it and see what happens. Some mushrooms are already colourful but I'm not sure about the rest of the forest being that way. 


I'm not sure about having the forest during autumn. I do really like the really green and brown forests but this could look really beautiful. I would be worried that the orange would be too similar to the light browns at the end of the narrative though...

Colourful Forest Plants:


Notes:

  • I could alter the design of existing flowers to suit my forest design (shape, colour, how they grow etc) because this is a "fantasy" forest
  • I could morph multiple flower elements together to create my own
  • I could design my own flowers from scratch 

Booklet Planning Layout (Rough) 2

Rough layout plan of booklet. Figuring out font size (I'll be writing by hand though). I might need to space out the text a bit more though as it is looking very text heavy. The text won't be in this format. I was figuring out what size I should hand write my booklet. 

Printed:
I printed and cut out the booklet and laid it out roughly. Here is a very bad panorama of it. It's an idea of size and layout (each square is A5 size). I like that it is a very long format as it ties in nicely with the long continuous narrative format.

Booklet Planning Layout (Rough)

Figuring out what I should include in the booklet and rough order/layout. 
 Planning to layout at final scale. Rough plan. Needs to be spaced out a lot more so there is room for the text and imagery to breathe. I'll start laying it out on Indesign/Photoshop so I have a better idea. 
Rough Planned Layout:

Front Cover
Page 1: 
  • Inside cover (plain)
Page 2: 
  • Species
  • Class
  • Lifespan
  • Height 
  • Drawn imagery of Froder
Page 3:
  • Appearance 
Page 4: 
  • Likes
  • Dislikes
Page 5:
  • Environment/Habitat
Page 6:
  • Personality
Page 7:
  • Life in General
Page 8:
  • Life in General Cont.
Page 9: 
  • Effects of Deforestation
Page 10:
  • Effects of Deforestation Cont.
  • Simplified guide on how to help
Page 11: 
  • Guide to help (If needed to continue on page 10)
  • OR last blank page
Page 12 (If needed)
  • Inside cover (blank)
Back cover

Thumb Nailing on A3s

Thumb nailing in a 5 section continuous narrative format. (I coloured Slidfrosk green so he's easy to find). I have always struggled with composition so I'll need to get feedback from fellow students and tutors. 

I'm not sure if changing the camera views drastically effects the composition or if its a bad idea to do. In traditional continuous narratives the angles were all over the place but that meant the perspective was completely wrong and very warped. 
 I'll keep thumb nailing on these A3 print outs and I'll narrow down a few compositions I like and them draw them up to scale to see if they work. I'll present my final composition at interim. 

Monday, August 15, 2016

Booklet Planning

Planning Booklet: What's in it?

  • Bio of Froder species (Drawn Froder, looks, general mannerisms, general personality, likes, dislikes, what they eat, when they sleep, how they live, their environment
  • "History" of Froders
  • How deforestation has effected its environment (endangered -links to orang-utans, hurts, killed etc) 
  • How we can help 
Content: (Needs to be written formally)
  • Looks: Similar to frogs, reptilian, long eyes, big eyes that vary in colour, tubby, long skinny arms
  • Mannerisms: Their name is a combination of frog and order. They hord and keep whatever interests them on their walks, 
  • Personality: Ranges from Froder to Froder but they keep to themselves/their species -prefer to be alone (which makes mating harder), quiet although they are constantly mumbling their thoughts to themselves
  • Likes: Walks, collecting items of interest, relaxing in the forest, eating, slugs or snails (make a good companion as they can't talk) 
  • Dislikes: Losing or having their belongings taken from them, too much interaction, too many froders around them at once, change of routine 
  • What they eat : Mosquitoes, moths, wet leaves 
  • Sleeping Pattern: Diurnal (active during the day and sleep at night)
  • How they live: Once Froders have chosen a place to live they will live their for life (unless leaving their parents homes or moving in with a partner). They often go for long walks in their surrounding environments and learn their areas very well. Some Froders have companions to join them on their walks (they are often slugs or snails). The only time Froders see their partners is when they are at home together. The Froder community is only seen together once a year (no human can understand when their gatherings are as they are very randomly put together in a year). These gatherings aren't enjoyed by Froders as they don't like to be around many beings at once. We can only understand they have these community gatherings to catch up with family members.
  • Environment: They live in forest environments underground (usually under trees with tree roots being the entrances)
  • History: Have always lives in forests and always lived this structured lifestyle. They are no threat (unless you're a moth or mosquito). Thrived a long time ago but are becoming more endangered as their environments are being destroyed and they have no amazing desire to mate. 
  • Effects of Deforestation: Destroying their environment and homes, hurting and killing them 
  • How we can help: List of how we can help deforestation. 
Style: Inside the Booklet
  • Brown paper, tea stained paper
  • Rough textured paper
  • Rough, scrawled writing OR old fashioned, beautiful writing
  • Brown or black ink drawings and writing (NO colour) 


Format: Inside
  • Fold out format
  • Hand bound format (my mother knows how to make books by hand so she can teach me how to make my own) 

Booklet Making Timeline: Rough Timeline
  • Write everything that needs to be in book
  • Draw what needs to be in book
  • Plan how to set out book
  • Figure out whether I'm printing out book or making it by hand (I am leaning toward making it by hand including drawings)
  • Learn how to make book by hand (mum will teach me) 

Friday, August 12, 2016

Wooden booklet Research


Rough Timeline

This is a rough timeline before I talked to Gray. This timeline will be altered when I finalize what path I decide to take. I am very interested in having a little booklet with my final stills too so I'll definitely throw that process in there somewhere.
Week 5:
  • ✓ Finalize story
  • ✓ Thumb nailing (4 out of 6 sheets done) 
  • ✓ Draw Scenes out to size
  • ✓ Design vehicle
  •  Start researching plants and colour scheme 
  •  Create rough booklet (for interim) 
Week 6: 
  • Finalize scene layout
  • ✓ Finalize colours
  • List assets to model
  • ✓ Draw up scene layout on scroll
Holiday Week 1:
  • Model vehicle
  • ✓ Make rough booklet (planning) 
Holiday Week 2:
  • Model forest assets -start
  • Camera run through on Maya
Week 7:
  • Model assets
  • Texture assets
  • Research lighting and start lighting tests
  • Make final booklet 
Week 8:
  • Finish models
  • Finish textures
  • Start scene layout
  • Start lighting
Week 9:
  • Finalizing lighting
  • Render
Week 10: 
  • Compositing 
  • Finalise final print
  • Plan write up
Week 11:
  • Print final
  • Mount final
  • Cont. write up
Week 12:
  • Finalize write up 
  • Finalise all hand ins
  • Hand in

Advisor Meeting with Gray Hodgkinson

Notes:

  • Focus on compositing and lighting -strong point
  • Less focus on modeling
  • If you have 3 finals they need to be A2 or A1 size 
  • Don't focus on the logging vehicle. If you do make it blur it in the background
  • Focus on my character's environment (houses etc) 
  • Plan and make a booklet describing the creatures life etc. Booklet could have a wooden cover to match his wardrobe back pack with no images inside. Booklet could fold out. Hand written, authentic looking, etc

Continuous Narrative Research

After talking with Caroline I decided a continuous narrative on a scroll would work really well with my ideas and story. continuous narrative is a type of narrative that illustrates multiple scenes of a narrative within a single frame. I will be keeping to the 5 frame number but they will all be combined in the one final. 

Last Judgement of Hu-Nefer (Book of the Dead), 1275 BCE/ Ancient Egyptian

The Tribute Money, Masaccio, 1425

, Biagio d'Antonio

Meeting with Caroline Campbell

Notes: 
  • 3 final stills isn't enough -at least 5. 7 is good. It helps with the narrative flow. No awkward jumping from scene to scene.
  • A3 size minimum
  • Think about how you will present your finals. Fold out booklet, mounted images, fold out paper set in a circle, continuous narrative etc
  • Be creative with your environment. Have it NZ based but add colour, shapes etc to show how rich and amazing nature is. This will help communicate the narrative with juxtaposition in the final still. Look at the hot room at the Wellington Botanical gardens.
  • Plan each still with this in mind: message, feeling/emotion its communicating, visual language (colour, shape, form) composition, how it flows to the next still 
Scribbles and Planning:


Shaun Tan: